v1.0.1Unity 2021.3+Last updated: Feb 2026
Physics & Baking
13. Physics Settling
The Settle button runs a physics simulation to make pieces fall and stack naturally.
How It Works
- •Temporary Rigidbodies and convex MeshColliders are added to each piece
- •Physics simulation runs for a configurable number of steps
- •Rigidbodies are removed, freezing pieces in their settled positions
- •Colliders are kept for scene interaction
Physics Settings (Physics Tab)
| Field | Description |
|---|---|
| Steps | Number of simulation steps (default: 500) |
| Timestep | Seconds per step (default: 0.02). Total sim time = Steps × Timestep. |
| Non-Convex Colliders | Decompose concave meshes into multiple convex hulls (for hollow lathe objects) |
| Decomposition Slices | Number of vertical slices for convex decomposition (2–12). More = better accuracy, slower. |
| Compound Shape Colliders | Use per-sub-shape box colliders (for tables, chairs) |
| Use Ground Plane | Add a temporary floor at the generator's Y position |
Rebuild Colliders
The ⚙ Colliders button in the Actions panel strips and reapplies all colliders based on each shape rule's current Collider Mode setting — useful when you've changed collider settings without regenerating.
Tips
- •Place the Generator above a surface with a collider, or enable Use Ground Plane
- •Enable Non-Convex Colliders for hollow lathe objects (bottles, vases)
- •Increase Steps for taller piles or complex stacking scenarios
- •The surface must be on the Surface Mask layer (set in Placement Rules)
14. Baking & Optimization
Open the Bake tab to access finalization options.
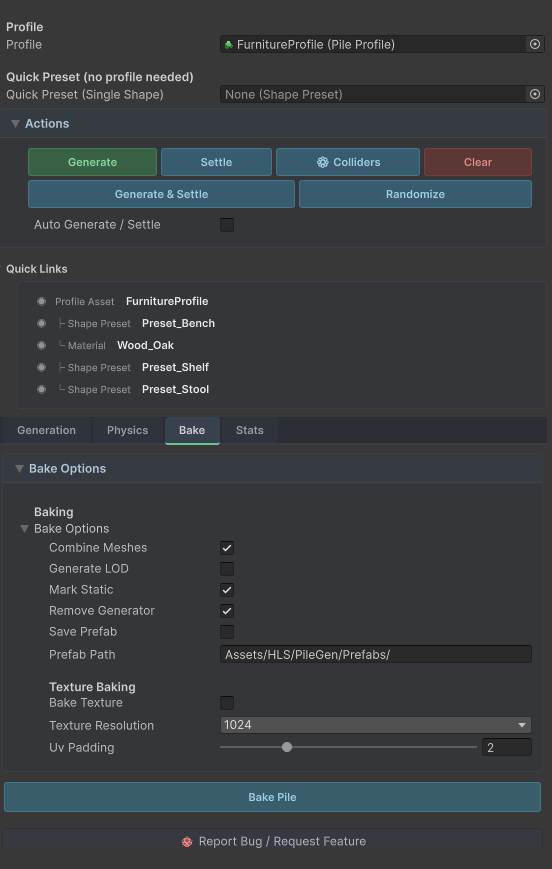 The Bake tab with mesh combining, LOD, static marking, prefab saving, and texture baking options.
Bake Options
| Option | Description |
|---|---|
| Combine Meshes | Merge all pieces into a single mesh (1 draw call). Supports multi-material combining. |
| Generate LOD | Create a LOD group with LOD0 (full) and LOD1 (fast grid-based decimation) |
| Mark Static | Set all GameObjects to static for static batching |
| Remove Generator | Remove the PileGenGenerator component after baking |
| Save Prefab | Save the baked pile as a prefab asset |
| Prefab Path | Folder where prefabs and mesh assets are saved |
Bake Workflow
- •Generate and (optionally) Settle your pile
- •Open the Bake tab
- •Enable desired options
- •Click Bake Pile
- •Confirm the dialog
After baking, the pile is a lightweight static mesh with no runtime generation overhead.
15. Texture Baking
Convert the procedural shader into a standard URP/Lit material with baked textures.
Why Texture Bake?
- •Performance — URP/Lit is cheaper than the procedural shader at runtime
- •Compatibility — Works with any rendering pipeline after baking
- •Lightmapping — Baked textures work with Unity's lightmapper
- •Export — Baked meshes can be exported to other tools
How It Works
- •Each piece is individually UV-unwrapped
- •The procedural shader is rendered into a texture tile per piece via GPU
- •All tiles are packed into a single texture atlas
- •UVs are remapped to the atlas
- •Meshes are combined into a single mesh
- •A new URP/Lit material is created with the baked atlas
Settings
| Field | Description |
|---|---|
| Bake Texture | Enable texture baking |
| Texture Resolution | Atlas resolution: 256, 512, 1024, 2048, or 4096 |
| UV Padding | Pixels of padding between UV islands (prevents bleeding) |
Workflow
- •Enable Bake Texture in the Bake tab
- •Choose resolution (1024 is a good default)
- •Click Bake Pile
The baked atlas PNG, mesh asset, and URP/Lit material are saved to the prefab path.